

Walk into the free weight zone of virtually any commercial gym, and you are bound to witness the exact same scene: a lifter plants one knee and one hand firmly onto a flat weight bench, grips a heavy dumbbell, and begins aggressively yanking the weight upward as though they are desperately trying to start a stubborn lawnmower engine.
It is the quintessential dumbbell row—a foundational exercise deeply embedded in the upper-body training splits of bodybuilders, powerlifters, and casual gym-goers alike. Yet, despite its ubiquity, it remains one of the most chronically mismanaged and improperly executed movements in modern strength training.
According to fitness authorities, the root of the problem is rarely that the biomechanics of the row are overwhelmingly complex. Instead, poor execution typically boils down to a dangerous combination of rushing, impatience, and mental fatigue. When lifters prioritize moving heavy numbers over clean, deliberate execution, they compromise their posture. This not only caps their maximum hypertrophy and strength potential but also places unnecessary stress on the spine and shoulder joints, paving the way for chronic injury.
Fortunately, a simple, game-changing adjustment can completely overhaul this dynamic: shifting your orientation on the bench. By altering your stance, you can instantly step away from sloppy mechanics and position yourself for targeted, high-intent repetitions.
To help lifters decode these common errors, Men’s Health Fitness Director Ebenezer Samuel, C.S.C.S., and Senior Editor Brett Williams, NASM-CPT, break down the anatomy of the dumbbell bench row, offering an authoritative blueprint to help you finally build the back width and thickness you’ve been chasing.

Executive Overview: The Anatomy of a Flawed Movement
For decades, the standard single-arm dumbbell row has been taught with one knee and one hand resting squarely on a flat bench. While this setup offers superficial stability, Samuel argues that it introduces a hidden vulnerability: structural inconsistency through the hips and spine.
When a lifter places one knee on the bench, it becomes remarkably easy to rotate the pelvis, twist the lower back, and leverage momentum rather than pure musculature to hoist the weight. This compensation pattern shifts the burden away from the target muscle groups—primarily the latissimus dorsi, rhomboids, and traps—and redistributes it to the lower back and biceps.
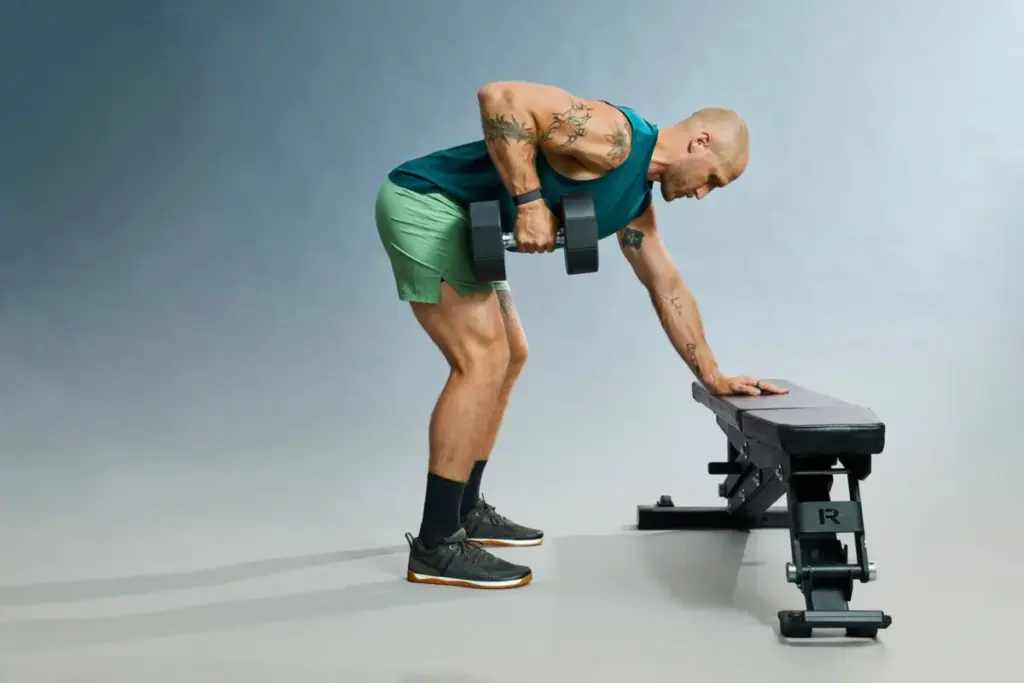
To reverse this trend, fitness experts advocate moving the inside knee off the bench entirely, shifting into a balanced, athletic hinge position. This minor modification forces the core and lower-back extensors to work in unison, securing the spine and establishing a rock-solid foundation.
Detailed Chronology: Step-by-Step Execution of the Perfect Dumbbell Row
Mastering the dumbbell row requires a meticulous, step-by-step breakdown of your setup and execution. Follow this detailed guide from Ebenezer Samuel to optimize every single repetition.
Step 1: Secure a Superior Stance
Abandon the traditional "knee-up" setup. Instead, place your left hand on the bench for upper-body support, and plant both feet firmly on the floor in an even, athletic stance.

"There’s nothing inherently wrong with the traditional way people do the dumbbell row, but that position invites a lot of inconsistency through the hips and, resultantly, through the spine," Samuel explains. "Especially when you start learning the dumbbell row, it’s important to learn to be in control of your hips and spine. That’s why a better starting point is with one hand on a bench and an even stance with your feet."
From this position, keep your hips completely square to the ground by engaging your core. Ensure your shoulders are positioned slightly higher than your hips. This requires active engagement from your back extensors, protecting your lower back from injury and keeping the tension where it belongs.
Step 2: Establish and Maintain Mid-Back Tension
The absolute first movement of the row should never be pulling with your arm. Instead, it starts with a deliberate squeeze of your shoulder blades.
"The first move when you do the row: Squeeze your shoulder blades," says Samuel. "Doing so will prevent you from doing the row with a rounded upper back, and it’ll help protect your shoulders in the long term."
Failing to initiate the movement with the scapula leads to an internal rotation of the shoulder joint, bringing the head of the humerus dangerously close to the clavicle. This poor alignment stresses labral and rotator cuff tendons. Intentionally retracting the shoulder blades ensures maximum recruitment of both the lats and rhomboids on every single rep.

Step 3: Pull with Your Back, Not Your Biceps
Once your posture and scapular retraction are locked in, focus on the pulling phase. It is remarkably easy to let the biceps take over, turning a back-building exercise into an awkward arm curl.
To combat this, visualize your forearm and hand as nothing more than a large hook gripping the dumbbell. Your sole focus should be driving your elbow as high as possible toward the ceiling. While your biceps will naturally assist with the movement, they should never serve as the dominant primary movers.
Supporting Context & Metrics: Why the Dumbbell Row Matters
To truly appreciate the value of the dumbbell row, one must examine how it fits into the broader ecosystem of human biomechanics and daily posture.
Offsetting Daily Life
Modern life forces humans into a state of chronic, horizontal pushing. Whether you are typing away at a desk for eight hours a day, driving a vehicle, or leaning over a kitchen counter, your arms are perpetually extended outward in front of your torso.
"Rowing movements are ideal for training your back because they directly offset the horizontal push positions that everyday life puts us in," notes Samuel. "When you row, you don’t just hit your lats, but you also build your rhomboids and rear delts, key muscle groups that offset all the pushing motions of life."

Unilateral vs. Bilateral Advantages
While barbell rows and fixed machine rows have their place in a comprehensive training program, using dumbbells offers distinct biomechanical advantages. Unilateral training allows for a significantly greater, more natural range of motion. It allows you to move along the natural path of your muscle fibers while simultaneously identifying and correcting strength imbalances between your left and right sides.
Official Guidelines: Muscles Targeted & Common Mistakes
If you want to maximize your time in the weight room, you must know what muscles you are training—and what pitfalls to actively avoid.
Primary Muscle Groups Targeted
- Latissimus Dorsi (Lats): The largest muscle of the back, responsible for giving your upper body that coveted "V-taper" width.
- Rhomboids (Major and Minor): Situated between the shoulder blades, these muscles retract the scapula and contribute to mid-back thickness.
- Trapezius (Traps): Assists in scapular elevation and stabilization throughout the pulling motion.
- Rear Deltoids: Secondary stabilizers that help pull the upper arm backward.
- Biceps Brachii and Brachialis: Act as dynamic stabilizers and secondary pullers.
Critical Mistakes to Avoid
- The "Knee-Up" Trap: Resting your knee on the bench opens the door for pelvic rotation and spinal misalignment.
- Elevated Hips: Bending over too far so that your hips rise higher than your shoulders puts unnecessary shearing forces on the lower back. Keep your hips below your shoulders.
- Head Lifting and Shoulder Shrugging: Tucking your chin down and straining your neck disrupts your spinal neutrality. Keep your neck in line with your torso.
- Swinging and Momentum: Heaving the weight upward using torso momentum completely bypasses the muscle fibers you are trying to stimulate. Control the eccentric (lowering) phase of every rep.
Future Outlook: Programming the Dumbbell Row for Maximum Growth
The dumbbell row is a timeless exercise that deserves a permanent home in your training regimen. To integrate it effectively, program it during your back or upper-body training days for 3 sets of 8 to 12 repetitions per arm using a moderate, challenging weight.
As your neuromuscular coordination improves and your strength increases, you can graduate to heavier dumbbells, scaling back the rep range to 6 to 8 reps to maximize mechanical tension and trigger optimal hypertrophy.
By cleaning up your stance, eliminating momentum, and treating the exercise with the biomechanical respect it demands, you will finally unlock the full developmental potential of your back.